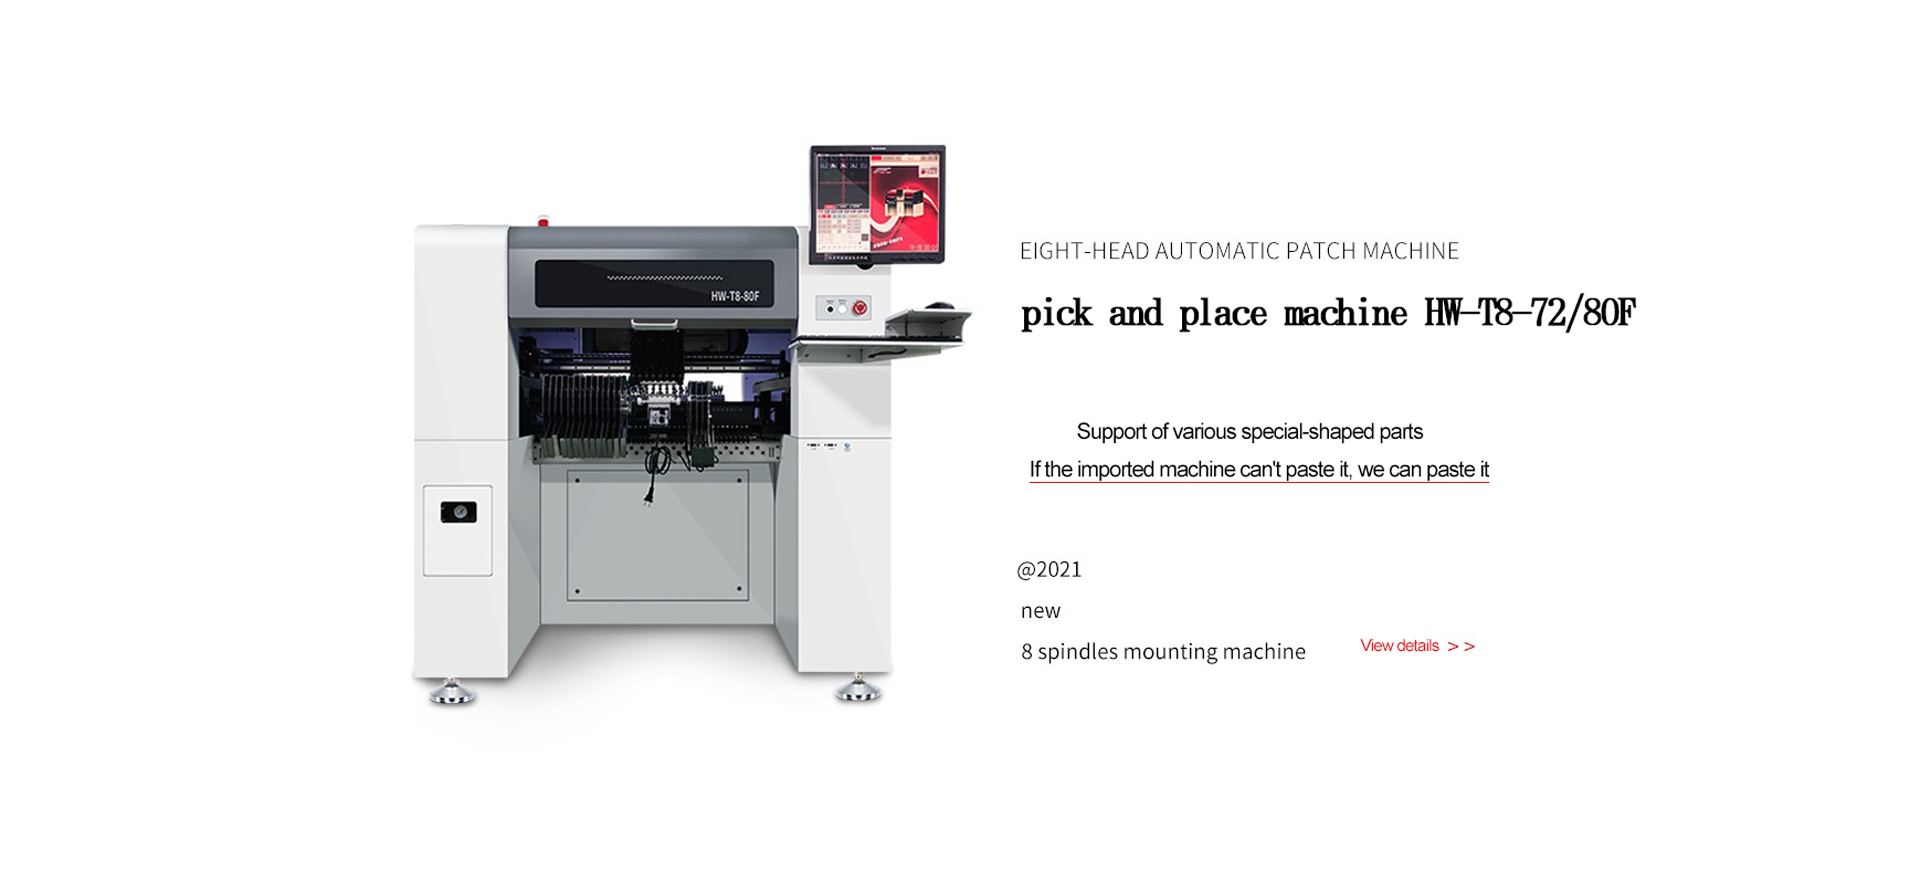
Huawei Silkroad Electronic Technology Co., Ltd.
- Sales manager:Mr. Liu
- Mobile/WhatsApp:+86 15931673319
- Address: East of Baimiao Village, Beiqijia Town, Changping District, Beijing


author: click::323 Publication time:2022-06-27
I, common tools for hand patches 1, forceps 2, suction pen 3,3-5 times desktop magnifying glass or 5-20 times stereo microscope (for pin spacing 0,5mm or less) 4, anti-static workbench 5, anti-static wristband two, hand patch patch sequence 1, first paste small components, then paste large components. 2, first paste the low element, and then paste the high component. 3, generally can be arranged according to the type of components of the flow of the patch station. One or more elements per person; Several placement stations can also be arranged for a large number of components. 4, you can set up an inspection station behind each patch station, you can also set up an inspection station behind several stations, you can also complete the whole board inspection after the patch. To be set according to the density of the assembled plates. Manual patch workshop three, manual patch patch step 1, patch team leader is responsible for the relevant work, according to the production task instructions, responsible for the production activities of the team, quality, quantity, punctual completion of production tasks. 2, the brush board personnel is responsible for checking the appearance of the printed board and the brush solder paste, and confirming the qualified post-release board. 3, before the patch, first check the material according to the process document, so that the component body identification, material box identification and the material specifications and models specified in the process document are consistent; 4, when working, according to the position and direction specified in the process document, the components with polarity should pay attention to their polarity; 5, should minimize the use of hands to directly contact the components, to prevent the oxidation of the solder ends of the components; 6, when placing components, the wrist area should be raised as much as possible, and the hand should be shaken as little as possible to prevent the printing of solder paste from being erased or the elements that have been pasted in the previous process are erased or displaced , and the destruction of the solder paste on the pad will also affect the quality of the solder; 7, after putting the components on the pad, you need to use a little force to press the components to make it combine well with the solder paste, prevent the components from shifting on the way to the transmission, but the unusable force is too large, otherwise it is easy to squeeze the solder paste onto the solder mask layer outside the pad, and it is easy to produce solder balls. 8, when placing as much as possible at once, especially multiple pins of integrated circuits, because the pin spacing is very small, if a bad placement, you need to correct, prohibit the components on the printed board to push in place, because this will cause the Solder end of the SMT components or circuit board pad paste off the pad, causing soldering failure and affecting reliability. This will destroy the solder paste on the pad, making it join together, which can easily cause virtual soldering or continuous soldering. 9, when patching BGA chip, you need to use BGA's dedicated chip system, you can not use the component frame and the white wireframe on the PCB as the alignment reference, you need to fully align the BGA solder ball with the PCB pad to ensure the soldering quality. If it is not corrected at one time, it is necessary to suck up the component and re-align and re-tap, and it is strictly forbidden to correct it, otherwise it is easy to appear bad such as bridge connection. 10, the operator must be qualified by professional training after taking up the post. Understand Surface Placement Technology (SMT) Welding: Process Methods and; Process requirements. 11, the operator is familiar with the chip component type, size specifications, resistance capacity representation of the blocking component, integrated circuit chip pin position, etc., pin spacing 0, narrow pitch devices below 65mm should be particularly careful with patches or with the help of 320 times microscope placement. 12, the polarity of the polarity components must be in line with the component position map 13, carefully check the chip material type of the required patch in the process file before patching, and be familiar with the position of the component patch on the printing plate. When the placement of the SMT component and the printed board is confirmed, the SMT can be applied. 14, the patch error generated in the patch process, should meet the standard, found that there is a patch defect after timely repair 15, in the patch process, should pay attention not to make the printed board displacement or touch other components. 26, when performing the patch, wear a good anti-static wrist sleeve, and the workbench should be well grounded. PCB sample four of the manual patch, the patch method of the manual patch 1, the patch method of the rectangular and cylindrical Chip assembly is to clamp the component with forceps, align the component welding ends to the pads at both ends, center the paste on the pad solder paste, the polar component patch direction should meet the requirements of the round paper, and after confirming the accuracy, gently press with forceps to make the component weld ends immersed in solder paste. 2, SOT's patch method uses forceps to clamp the component body, align the direction, align the pads, center the paste on the pad paste, confirm the accuracy and gently press the component body with forceps, so that the component pins are not less than 1/2 of the thickness immersed in the paste, requiring all component pins to be placed on the pad. 3, SOP, QFP's patch method device 1. Foot or front end logo alignment of the printed board character front end logo, with forceps or suction pen clamp or suction device, alignment of the logo, alignment of both sides or four sides of the pad, center placement, and with forceps gently press the top surface of the device, so that the component pins are not less than 1/2 thickness immersed in solder paste, requiring all component pins to be placed on the pad. 4, SOJ, PLCC's placement method SOJ, PLCC's placement method is the same as SOP, QFP, because soJ, PLCC's pins are at the bottom around the device, so when centering, you need to use your eyes to check whether the pins are aligned with the pad from the side of the device at a 45-degree angle from the side of the device to the PCB board. Fifth, to ensure the quality of the three elements of manual patch 1, first of all, the components should correctly require the type, model, nominal value and polarity of each assembly bit component to meet the assembly drawings and schedule requirements of the product, and can not be misplaced; 2, the position of the component patch is accurate The ends or pins of the components are aligned and centered with the pad graphics as much as possible, and it is also necessary to ensure that the component welding ends are in contact with the solder paste graphics. The position of the component chip should meet the process requirements. The role of the chip component self-positioning effect of the two ends is relatively large, the component width direction is more than 3/4 superimposed on the pad when the patch is applied, and the two ends in the length direction only need to be overlapped to the corresponding pad and contact the solder paste pattern, and then the soldering can be self-positioned, but if one of the ends is not docked to the pad or there is no contact with the solder paste pattern, the displacement or suspension bridge will occur when the soldering is reflowed; The position of the manual patch should be accurate for the self-positioning effect of SOP, SOJ, QFP, PLCC and other devices, and the chip offset cannot be corrected by reflow soldering. If the placement of the chip exceeds the allowable deviation range, it must be manually corrected before entering the reflow furnace for welding. Otherwise, it must be rebuilt after re-soldering, which will cause waste of man-hours, materials, and even affect product reliability. When the position of the patch is found to be outside the allowable deviation range during the production process, the chip coordinates should be corrected in time. 3, the pressure (patch height) is appropriate. The chip pressure (Z axis height) should be appropriate and the chip pressure is too small, the component weld end or pin floats on the surface of the solder paste, the solder paste cannot stick to the component, and it is easy to produce position movement when transferring and reflowing the soldering, and because the Z axis height is too high, the component is thrown from a high place when the chip is applied, which will cause the placement of the chip to be offset; The height of the manual patch of the patch component should be appropriate and the pressure of the patch is too large, the amount of solder paste extrusion is too much, it is easy to cause the solder paste to stick, and it is easy to produce bridging when re-soldering, and it will also cause the placement of the chip to be offset due to sliding, and it will also damage the components when it is serious.